
I bet you heard about Attribute-Based Access Control, also known as ABAC or Tag-Based Access Control in AWS,
and that's no surprise.
AWS themselves mention the flexibility it offers:
"When you use tags to control access to your AWS resources, you allow your teams and resources to grow with fewer changes to AWS policies. ABAC policies are more flexible than traditional AWS policies, which require you to list each individual resource."
AWS IAM Documentation
Or consider this from AWS:
"ABAC is helpful in environments that are scaling and in situations where identity or resource policy management has become complex."
AWS IAM Documentation
AWS has been actively promoting ABAC across their services.
It's been introduced for:
- Amazon S3 general purpose buckets
- Amazon SQS
- Amazon ECS
- EC2 instances and Systems Manager Session Manager
In fact, there's a whole topic dedicated to ABAC in the AWS Security Blog.
Tag-Based Access Control is definitely worth looking into!
Today we'll see how we can achieve the simplest use case of ABAC.
But I want you to think of the implications
of this implementation for your environment.
Maybe you can start deploying ABAC with TagOps!
Requirements
Before we begin, you'll need:
- Admin Access to your AWS Identity Center + SAML Connection to your Identity Provider (we'll use Google Workspace in our example)
- Admin access to your Identity Provider (in our case, Google Workspace)
Understanding the AWS Documentation
We'll be working with two key AWS documentation resources:
From these links, we see that AWS supports the ability to attach session-based tags from the Identity Provider, based on SAML attributes.
Step 1: Configure SAML Attribute Mapping in Google Workspace
For our use case today, we'll explore the https://aws.amazon.com/SAML/Attributes/PrincipalTag:Department
attribute, which passes a tag key 'Department' with the value that was set in the request during SAML assertion.
To configure this in Google Workspace:
- Navigate to
admin.google.com - Go to Apps → Web & Mobile apps
- Click on "AWS Application"
- Go to SAML attribute mapping
- Click "Add Mapping"
- Map "Department" to
https://aws.amazon.com/SAML/Attributes/PrincipalTag:Department
This should look like this:
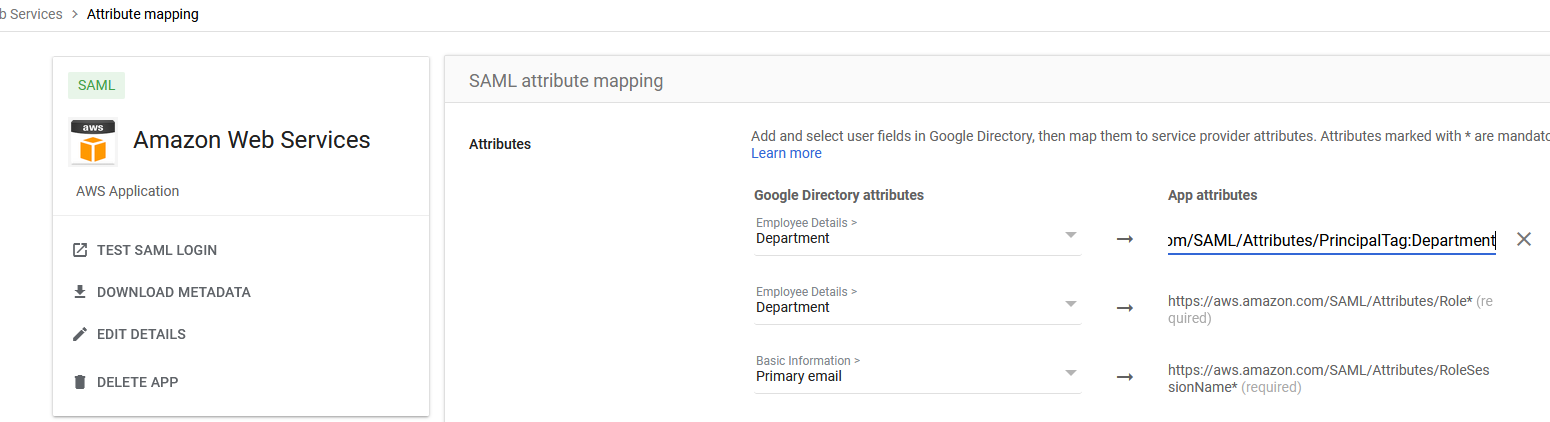
Save!
Step 2: Configure AWS Identity Center Attributes
Next, go to AWS Identity Center:
- Navigate to AWS Console → Identity Center
- Go to Settings → Attributes for access control (if you don't have it, check the blue popup - you might need to enable the feature)
- Click "Manage Attributes" → "Add Attribute"
- Set Key:
Department - Set Value:
${path:enterprise.department}
This will map the attribute passed from the SAML assertion to your request parameters when making requests in AWS.
Think About the Possibilities
At this point, you might want to stop and think about what else you can do with this information. The possibilities are huge! You can pass so much information from your Identity Provider - user roles, departments, cost centers, project assignments, and more.
Step 3: Configure the IAM Policy
Now the only thing left is to configure our policy. Either create a new permission set or modify an existing one, and add this policy to the permission set.
You can add it as an inline policy or managed policy. I suggest managed because then you can re-use them in different permission sets if needed.
{
  "Version": "2012-10-17",
  "Statement": [
    {
      "Sid": "DenyStopIfDepartmentNotMatchOrMissing",
      "Effect": "Deny",
      "Action": "ec2:StopInstances",
      "Resource": "*",
      "Condition": {
        "StringNotEquals": {
          "aws:ResourceTag/Department": "${aws:PrincipalTag/Department}"
        }
      }
    }
  ]
}
What this policy does: It denies you the action of stopping an instance if your 'Department' tag doesn't match the resource 'Department' tag.
For example, if your resource Department tag is RnD and your Department tag is QA,
you won't be able to perform the action (in our case StopInstances).
Expand Your Policy
Once again, stop and think about what other actions you might want to include in this policy! The possibilities are huge - you could restrict StartInstances, TerminateInstances, ModifyInstanceAttribute, and many more actions based on department tags.
Step 4: Test the Policy
Let's go and test the policy:
- Provision the permission set to an AWS account (or if it's an existing one, just log into one of the accounts)
- Once in the account, create an instance and give it a tag different than the one of your department
- Attempt to stop the instance
You will get a deny that looks like this:

That's great, isn't it? But you might be asking: "Yeah, that's cool - but how do I scale it up? It sure is easy with 1 resource, but what if I have hundreds?"
Scaling ABAC with TagOps
That's a great question, and the answer is simple - TagOps.
TagOps can help you provision and manage those Department tags at scale. With TagOps, you can create a rule
that automatically provisions your tags on all resources.
On top of that, TagOps can automatically remediate tags that were modified outside of TagOps, and roll back to the original tag if needed. (As per the rule configuration in TagOps)
So if someone changes the tag manually, TagOps will automatically roll back the tag to the original value.
For example:
- If a resource name contains "prod", add tags
Environment:Prod,Department:IT - If resource type is EC2 and region is us-east-1, add tag
Department:Operations - If resource has tag "Project" equals "WebApp", add tag
Department:Engineering
There are plenty of different conditions you can use, not just resource name. You can filter by:
- Resource type
- Region
- AWS account
- Tag keys
- Tag key-values
- And more!
So if you combine what you saw earlier with TagOps, you get an interesting solution that will definitely help you achieve ABAC if you wish to!
Ready to Implement ABAC with TagOps?
Start your free trial with TagOps and automate tagging across all your AWS resources to enable scalable ABAC policies.