
AWS Backup is a fully managed backup service that makes it easy to centralize and automate
the backup of data across AWS services.
But how would you back up specific resources? For example, you want to back up only the resources that are tagged with a specific tag, or only production resources.
This is where AWS tagging automation comes in. TagOps provides automatic AWS tags for your resources, ensuring consistent tagging across your AWS infrastructure. With automatic AWS tags, you can automate the backup of specific resources based on tags.
In this article, we'll explore how to implement AWS tagging automation for AWS Backup resources using TagOps to apply automatic AWS tags automatically.
Why Use AWS Tagging Automation for AWS Backup?
Implementing AWS tagging automation with automatic AWS tags for backup resources provides several benefits:
- Operational Excellence: Quickly identify backup resources with automatic AWS tags applied as soon as they are created
- Availability: Thanks to automatic AWS tags, AWS Backup will always back up your most critical resources
- Automated Governance: AWS tagging automation enforces tagging policies automatically without manual intervention (which can be error-prone)
- Cost Allocation: Track backup costs by department, project, or environment using automatic AWS tags
Understanding AWS Backup Resource Types
AWS Backup manages several resource types that can benefit from automated tagging:
- Backup Plans: Define when and how backups are created
- Backup Vaults: Containers that organize and store recovery points
- Recovery Points: Point-in-time backups of your resources
- Backup Selections: Define which resources to back up
Step 1: Onboard your AWS Accounts to TagOps
Navigate to console.tagops.cloud, log in to your account and navigate to the AWS Accounts page. Click on the "Add AWS Account" button and follow the instructions to onboard your AWS Accounts to TagOps. You will need to provide the following information:
- AWS Account Name: A custom name for your AWS Account that will be used in TagOps
- AWS Account ID: The 12-digit AWS account number
- IAM Role Name: The name of the IAM role that will be used to access the AWS Account
- External ID: The external ID that will be used to access the AWS Account
Once the CloudFormation stack is created, click on the "Verify Account" button to verify that the account has been onboarded successfully.
Step 2: Configure AWS Tagging Automation in TagOps for Automatic AWS Tags
Navigate to console.tagops.cloud, log in to your account and navigate to the Rules page. Click on the "Add Rule" button and follow the instructions to create a new rule for AWS tagging automation. You will need to provide the following information:
- Rule Name: A custom name for your AWS tagging automation rule that will be used in TagOps
- Rule Conditions: The conditions that must be met for the rule to apply (e.g., resource type, region, account, tag key, tag value, etc.) Here you can use the "Resource Type" condition to match the resource type of the AWS Backup resource. For example see this image:
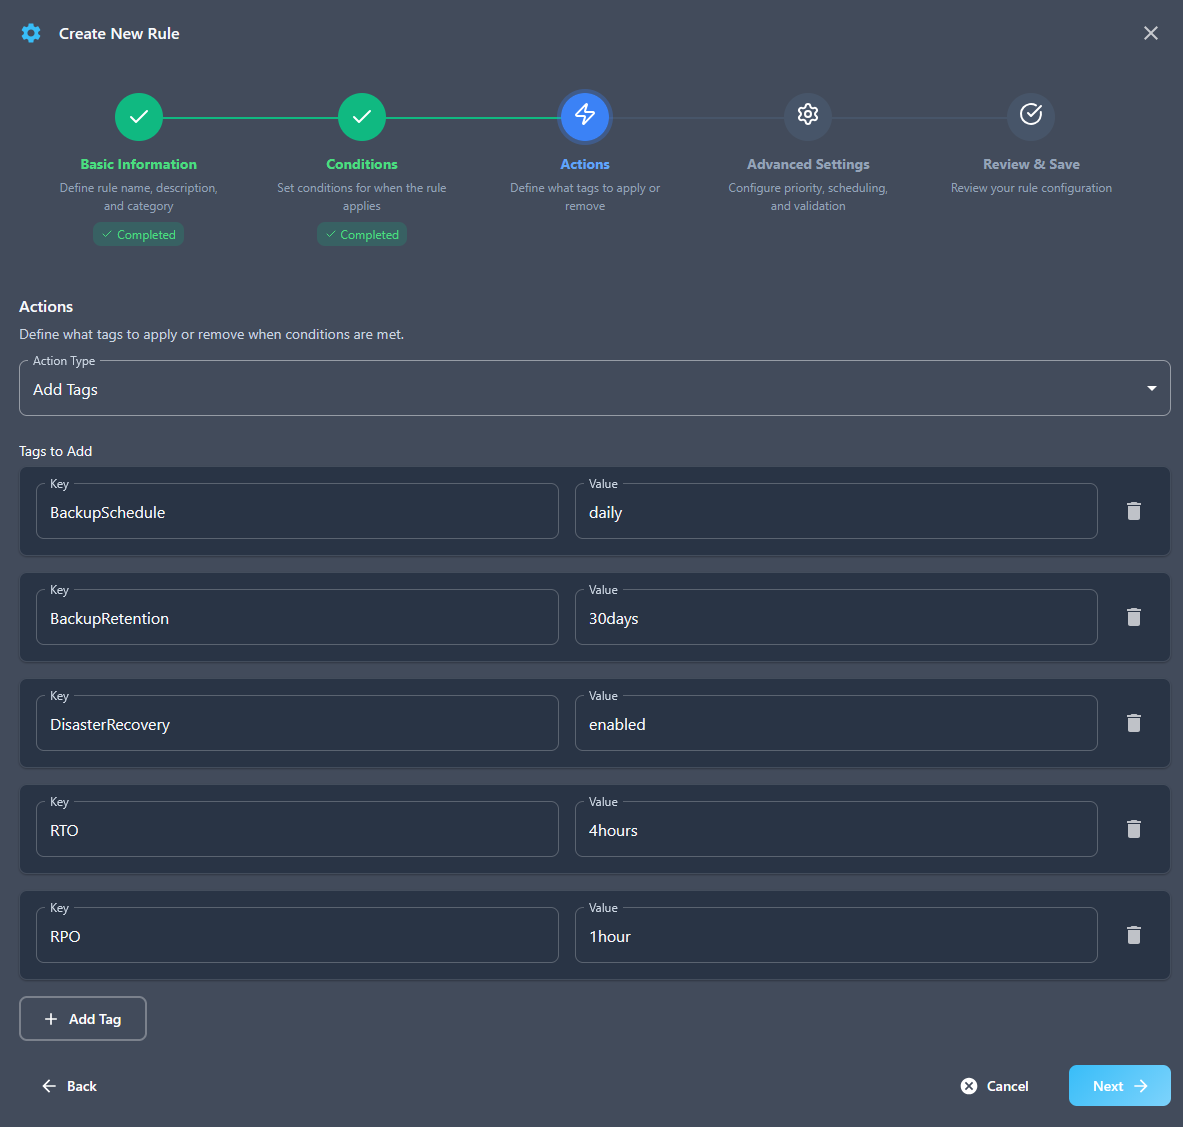
- Rule Actions: The automatic AWS tags that will be applied to the AWS Backup resource when the AWS tagging automation rule is applied. Here you can use the "Add Tag" action to add a new automatic AWS tag to the AWS Backup resource. For example see this image:

Step 3: Create your AWS Backup Plan
In your AWS Account, create an AWS Backup plan as per AWS documentation:
https://docs.aws.amazon.com/aws-backup/latest/devguide/creating-a-backup-plan.html
Don't forget to configure backup plan resource assignment using tags (1 or any of the tags you created in TagOps in Step 2)
https://docs.aws.amazon.com/aws-backup/latest/devguide/assigning-resources.html#backup-resource-assignment
That's it! You have now configured AWS tagging automation in TagOps to apply automatic AWS tags to AWS Backup resources.
From this moment on, the following happens with your AWS tagging automation (if a given AWS resource matches the conditions of the rule you have configured):
- When a new AWS resource is created, TagOps AWS tagging automation will automatically apply automatic AWS tags with the tags you have configured.
- When an existing AWS resource is updated, TagOps AWS tagging automation will automatically apply automatic AWS tags with the tags you have configured.
- Once a day, TagOps AWS tagging automation will scan your AWS Account for AWS resources that are not tagged and apply automatic AWS tags with the tags you have configured.
(You can change the daily scan time in TagOps Console -> Settings -> System Settings -> Scan Settings)
Ready to Implement AWS Tagging Automation with Automatic AWS Tags?
Start your free trial with TagOps and implement AWS tagging automation to apply automatic AWS tags across all your AWS resources. Get automatic AWS tags for your entire infrastructure in minutes.