
Running EC2 instances and RDS databases 24/7 when they're only needed during business hours is one of the most common sources of unnecessary AWS costs.
Development and testing environments, in particular, can consume significant resources while sitting idle nights and weekends.
By implementing tag-based scheduling, you can automatically start and stop instances based on predefined schedules,
reducing costs by up to ~70% for non-production workloads while maintaining full operational control.
In this comprehensive guide, we'll explore how to automate EC2 and RDS instance scheduling using tags with TagOps,
AWS Systems Manager Maintenance Windows to create a robust, cost-effective scheduling solution.
The Cost Impact of Unmanaged Instance Scheduling
Before diving into the solution, let's understand the problem. Consider a typical development environment:
- Development EC2 Instances: 10 instances (for example m6i.large) running 24/7 at $0.10/hour = $720/month per instance = $7,200/month total
- With Business Hours Scheduling: Running only 50 hours/week (Mon-Fri, 8 AM-6 PM) = $2,000/month total
- Potential Savings: $5,200/month (72% reduction) for development environments alone
For RDS databases, the savings can be even more significant, especially for Multi-AZ deployments. A single db.t3.medium RDS instance running 24/7 costs approximately $52/month, but with proper scheduling, you can reduce this to $15/month for business-hours-only usage-a 72% cost reduction.
Why Tag-Based Scheduling?
Tag-based scheduling provides several critical advantages over manual or hardcoded scheduling approaches:
- Scalability: Automatically include new resources in scheduling without updating automation scripts
- Flexibility: Different schedules for different environments (e.g., dev stops at 6 PM, staging runs 24/7)
- Maintainability: Centralized scheduling logic based on metadata rather than resource IDs
- Consistency: Ensure all resources matching criteria are scheduled, preventing manual configuration errors
- Operational Excellence: Resources are automatically tagged when created, immediately included in scheduling workflows
Understanding the Scheduling Architecture
A tag-based scheduling solution consists of three key components:
- Tagging Automation (TagOps): Automatically applies scheduling tags to EC2 instances and RDS databases when they're created or discovered
- Scheduling Engine: AWS Systems Manager Maintenance Windows that read tags and execute start/stop actions
- Automation Documents: Pre-built SSM documents like
AWS-StartEC2Instance,AWS-StopEC2Instance,AWS-StopRdsInstanceandAWS-StartRdsInstancethat perform the actual start/stop operations
Step 1: Onboard Your AWS Accounts to TagOps
Before configuring scheduling tags, ensure your AWS accounts are connected to TagOps:
- Navigate to console.tagops.cloud and log in to your account
- Go to the AWS Accounts page and click "Add AWS Account"
- Provide the required information:
- AWS Account Name: A descriptive name for your AWS account (e.g., "Production", "Development")
- AWS Account ID: Your 12-digit AWS account number
- IAM Role Name: The name of the IAM role TagOps will use to access your account
- External ID: A unique identifier for secure cross-account access
- Create the CloudFormation stack in your AWS account to provision the necessary IAM role
- Click "Verify Account" to confirm successful onboarding
Step 2: Configure TagOps Rules for EC2/RDS Instance Scheduling
Create a TagOps rule to automatically tag EC2/RDS instances for scheduling in the environment you want to schedule. This ensures that any new instance matching your criteria is immediately included in your scheduling automation.
Scheduling Rule Configuration
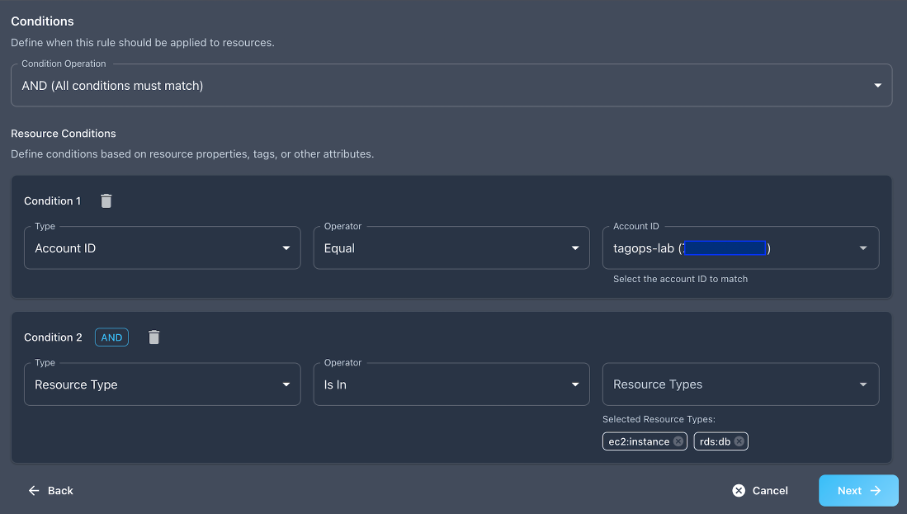
Navigate to the Rules page in TagOps and create a new rule with the following configuration:
Condition Operation: AND
Account ID Condition:
- Type:
Account ID - Operator:
Equal - Value:
(your AWS account ID)
Resource Type Condition:
- Type:
Resource Type - Operator:
Is In - Value:
ec2:instance, rds:db
Rule Actions:
- Add Tag:
StopStartAutomation=enabled(for Systems Manager targeting) - Add Tag:
Environment=Development(orStaging,Testas needed)
Step 3: Create an IAM Role with Automation Permissions
Before setting up maintenance windows, you need to create an IAM role that Systems Manager can assume to execute the automation documents for starting and stopping EC2 instances and RDS databases.
Create the IAM Role via AWS Console
Follow these steps to create the IAM role through the AWS Management Console:
- Go to the IAM service in the AWS Management Console
- Click on "Roles" in the left navigation menu
- Click "Create role"
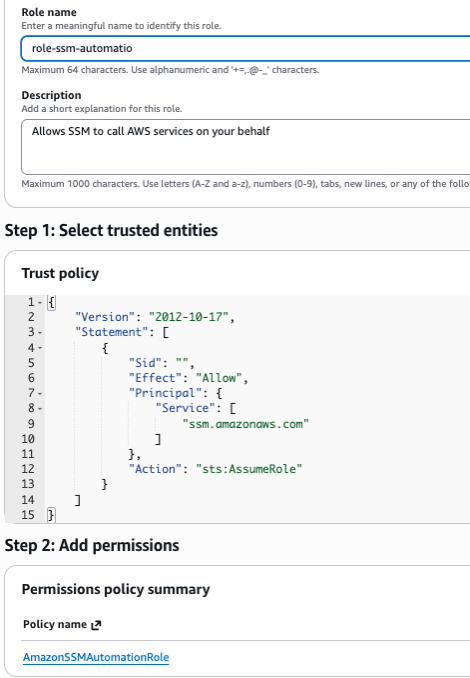
- Under "Select trusted entity", choose "AWS service"
- Select "Systems Manager" from the service list
- Choose "Systems Manager" as the use case (for maintenance windows and automation)
- Click "Next"
- In the permissions policy search, find and select "AmazonSSMAutomationRole" policy
- Click "Next"
- Enter a role name (e.g.,
role-ssm-automation) - Add a description:
Role for Systems Manager to start/stop EC2 instances and RDS databases - Click "Create role"
Verify the Role
After creating the role, note the role ARN. You'll need it when registering tasks with maintenance windows.
The ARN format will be: arn:aws:iam::ACCOUNT_ID:role/role-ssm-automation
Important: Ensure the role has the necessary trust relationship to allow Systems Manager to assume it.
The trust policy should include ssm.amazonaws.com as a trusted service.
Step 4: Create a StopAutomation SSM Maintenance Window
Next, you will create an SSM Maintenance Window that automatically stops your instances based on the StopStartAutomation = enabled tag you configured in TagOps.
Create the Maintenance Window (StopInstances)
In the AWS Management Console:
- Go to AWS Systems Manager → Maintenance Windows
- Click "Create maintenance window"
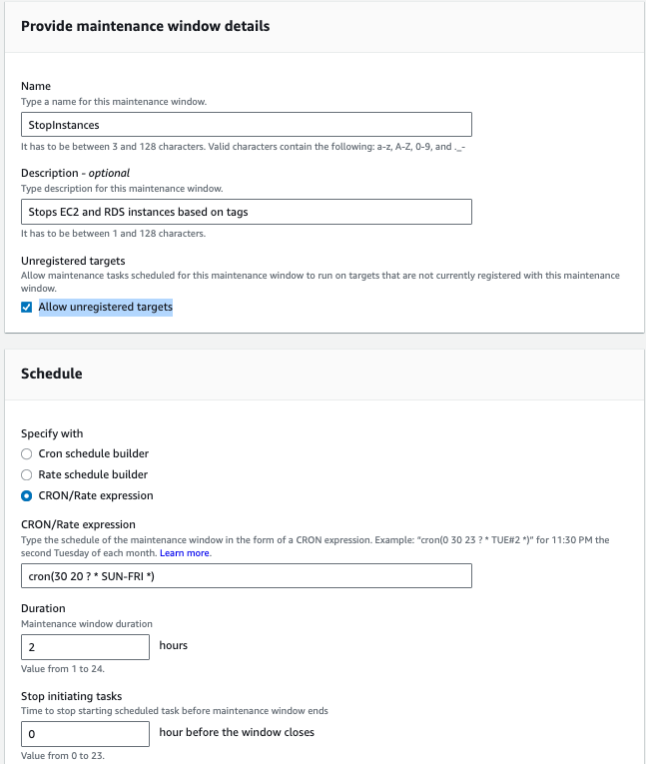
- Add a name, for example
StopInstances, and a meaningful description such asStop EC2 and RDS instances based on tags - Under Targets, select "Allow unregistered targets" so you can target instances by tags
- In the Schedule section, choose Cron/Rate expression and enter a cron expression that fits your stop time.
To stop instances at 20:30 (8:30 PM) from Sunday to Friday, use:
cron(30 20 ? * SUN-FRI *) - Set the Duration (for example,
2hours) and Cutoff (for example,1hour) according to your needs - Review the configuration and click "Create maintenance window"
Register Targets Using Tags
After the maintenance window is created:
- Click on the newly created maintenance window (e.g.,
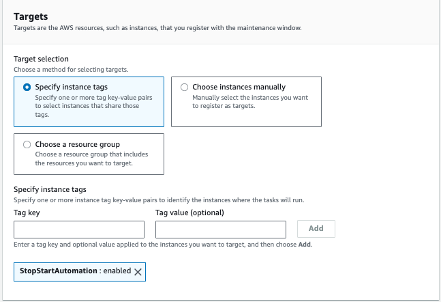
StopInstances) - Go to the Targets tab and click "Register target"
- Under Target selection, choose "Specify instance tags"
- Provide the tag key and value you configured in TagOps, for example:
StopStartAutomation = enabled - Save the target configuration
Register the Stop Task
Follow these steps to register the AWS-StopEC2Instance automation document:
- In the maintenance window you just created, go to the "Tasks" tab
- Click "Register tasks" (note: the button may say "Register task" or "Register tasks")
- Under "Task type", select "Automation"
- In the "Automation document" section:
- Search for and select "AWS-StopEC2Instance" (owned by Amazon)
- Ensure the document version is set to "Default version at runtime"
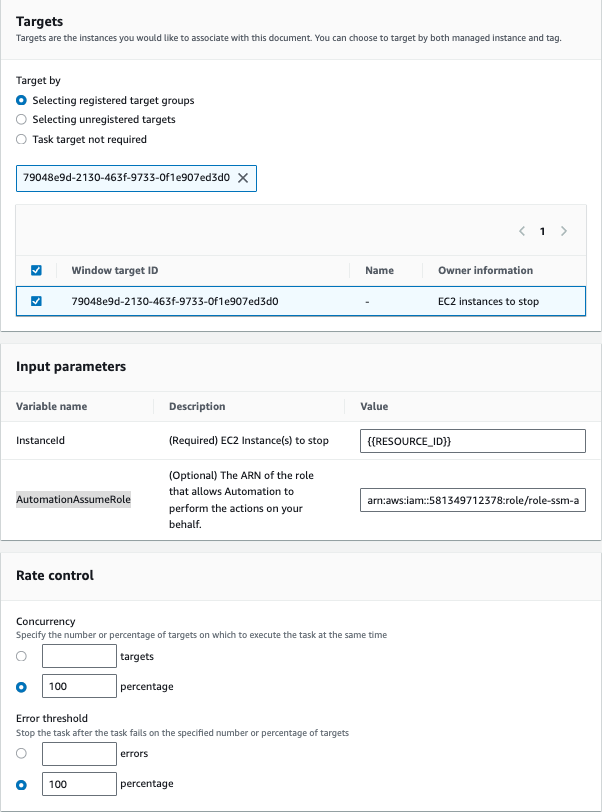
- Under "Target selection", choose "Selecting registered target groups"
- Select the target group you created in the previous step (the one targeting instances with
StopStartAutomation = enabled) - Under "Input parameters", configure the following:
- InstanceId: Enter
{{RESOURCE_ID}}(this is a placeholder that will be replaced with each target instance ID) - AutomationAssumeRole: Enter the ARN of the IAM role you created in Step 3 (e.g.,
arn:aws:iam::ACCOUNT_ID:role/role-ssm-automation)
- InstanceId: Enter
- Set "Task priority" to
1(or your preferred priority) - Configure "Concurrency" (e.g.,
10to stop up to 10 instances simultaneously) - Configure "Errors threshold" (e.g.,
1to stop the task if more than 1 instance fails) - Review the configuration and click "Register task"

Stop RDS Instances
For RDS Instance Stop Automation, create an additional maintenance window task, follow the same process but use different automation documents:
- Use
AWS-StopRdsInstancefor stopping RDS instances - Note: RDS instances take longer to start/stop than EC2 instances-plan your schedules accordingly
Create a StartAutomation Maintenance Window
To automatically start instances in the morning, create a separate maintenance window:
- Create a new maintenance window named
StartInstanceswith a schedule likecron(0 9 ? * MON-FRI *)(9:00 AM weekdays) - Register the same target group (instances with
StopStartAutomation = enabled) - Register a task using the
AWS-StartEC2InstanceandAWS-StartRdsInstanceautomation documents - Use the same input parameters:
InstanceId = {{RESOURCE_ID}}and the sameAutomationAssumeRole
Conclusion
Automating EC2 and RDS instance scheduling based on tags provides a scalable, maintainable solution for cost optimization. By combining TagOps for automatic tagging with AWS Systems Manager Maintenance Windows for execution, you can:
- Reduce EC2 and RDS costs by 55-75% for non-production environments
- Eliminate manual scheduling configuration and maintenance
- Ensure consistent scheduling coverage across all eligible resources
- Maintain operational flexibility with tag-based resource selection
The key to success is starting with a clear tagging strategy, implementing TagOps rules for automatic tag application, and configuring maintenance windows that align with your business needs. With proper implementation, tag-based scheduling becomes a set-and-forget solution that continuously optimizes your AWS costs.
Ready to Automate Your Instance Scheduling?
Start your free trial with TagOps and automatically tag your EC2 and RDS resources for scheduling. Reduce costs without manual configuration.