Naming Conventions User Guide
This guide provides step-by-step instructions for creating, managing, and using naming convention rules in TagOps.
Table of Contents
- Creating a Naming Convention Rule
- Managing Rules
- Attaching Rules to Accounts
- Viewing Compliance Status
- Acknowledging Invalid Resources
- Editing Resource Names
- Recalculating Compliance
Creating a Naming Convention Rule
Step 1: Access the Naming Conventions Page
- Navigate to Naming Conventions from the main menu
- Click the Create Rule button
Step 2: Define the Naming Format
Select the case format for your naming convention:
- PascalCase:
VpcDevProject(each word capitalized, no delimiter) - camelCase:
vpcDevProject(first word lowercase, rest capitalized, no delimiter) - snake_case:
vpc_dev_project(lowercase with underscores) - kebab-case:
vpc-dev-project(lowercase with hyphens) - SCREAMING_SNAKE_CASE:
VPC_DEV_PROJECT(uppercase with underscores)
Step 3: Define Block List
Blocks are the individual components that make up a resource name. You can define two types of blocks:
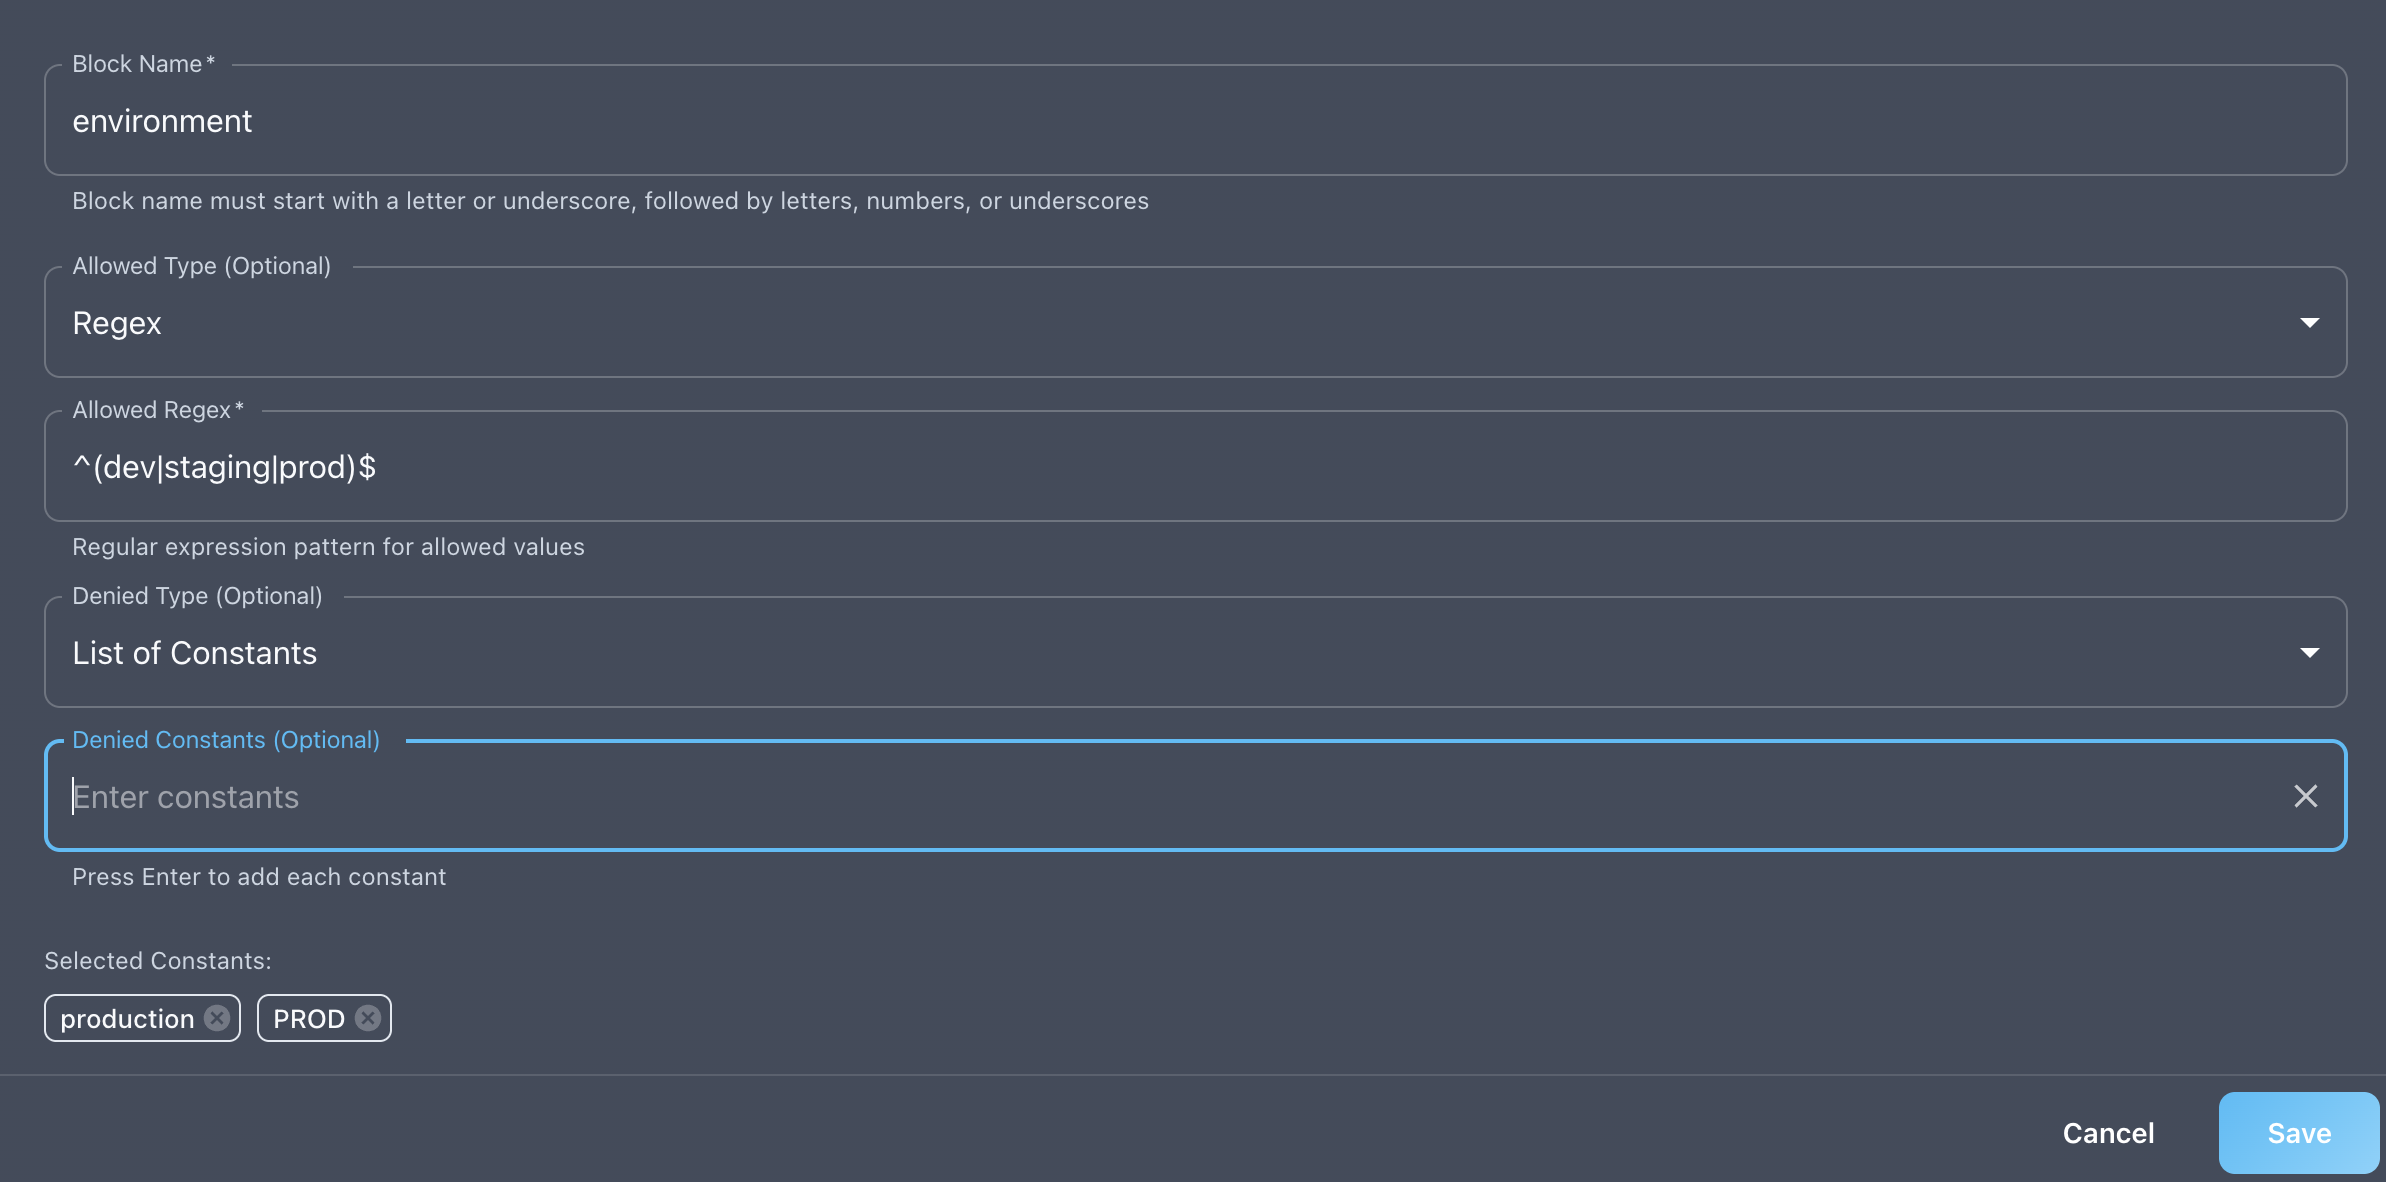
General Blocks
General blocks validate individual name segments:
- Click Add Block and select General
- Enter a block name (e.g., "environment", "project", "custom")
- You may configure only Allowed rules or only Denied rules, or both together for a block.
-
Configure allowed rules:
- You may configure only Regex or List of Constants
- Regex: Pattern that must match (e.g.,
^(dev|staging|prod)$) - List of Constants: Exact values that are allowed (e.g.,
["dev", "staging", "prod"])
-
Configure denied rules:
- You may configure only Regex or List of Constants
- Regex: Pattern that must not match
- List of Constants: Values that are not allowed
Understanding Allowed vs Denied Rules
It's important to understand the difference between these two rule types:
- Allowed rules: Define what values are permitted (whitelist approach). Only values matching these rules will be accepted.
- Denied rules: Define what values are prohibited (blacklist approach). Values matching these rules will be rejected, even if they might otherwise be valid.
- Using both: When both are configured, a value must match an allowed rule AND must not match any denied rule to be valid. This provides fine-grained control—for example, allowing a pattern but excluding specific variations.
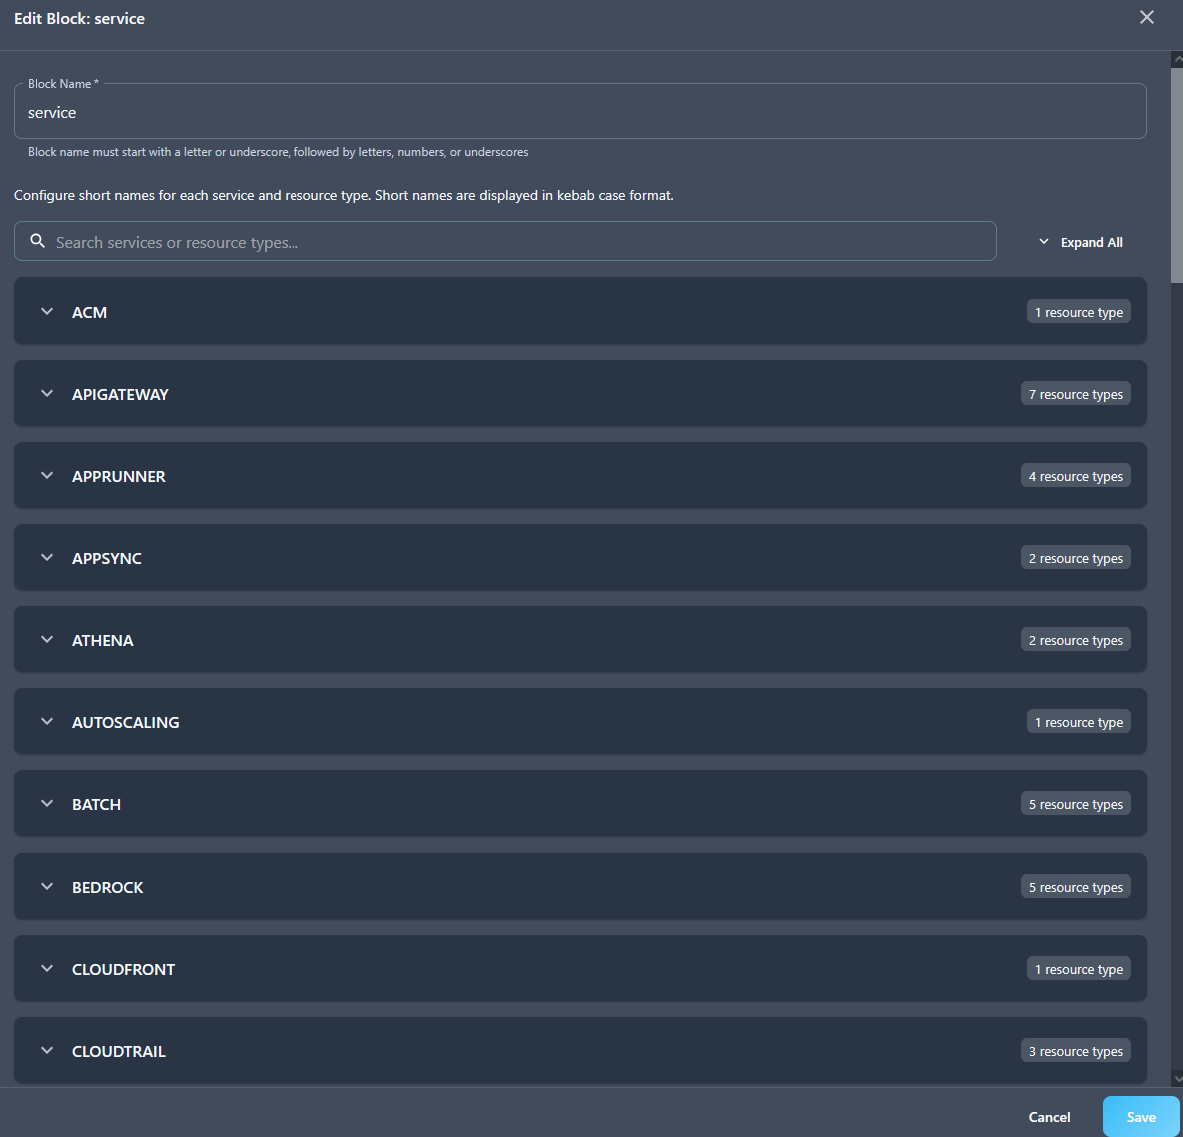
Short Names Blocks
Short names blocks validate against predefined service-specific abbreviations:
- Click Add Block and select Short Names
- Enter a block name (typically "service")
- By default, TagOps fills in the standard abbreviations for all supported AWS services and resource types for this block.
- You can fully edit or customize any of the short names at any time—simply modify the abbreviations as needed before saving or when editing rules later.
Note: Short names blocks can only be used once in a structure and consume multiple name segments based on the abbreviation length.
Step 4: Define Structure
The structure defines the order and priority of blocks in the resource name:
- Drag and drop to reorder blocks
- Important: The last block in the structure becomes the suffix block if suffix rules are enabled.
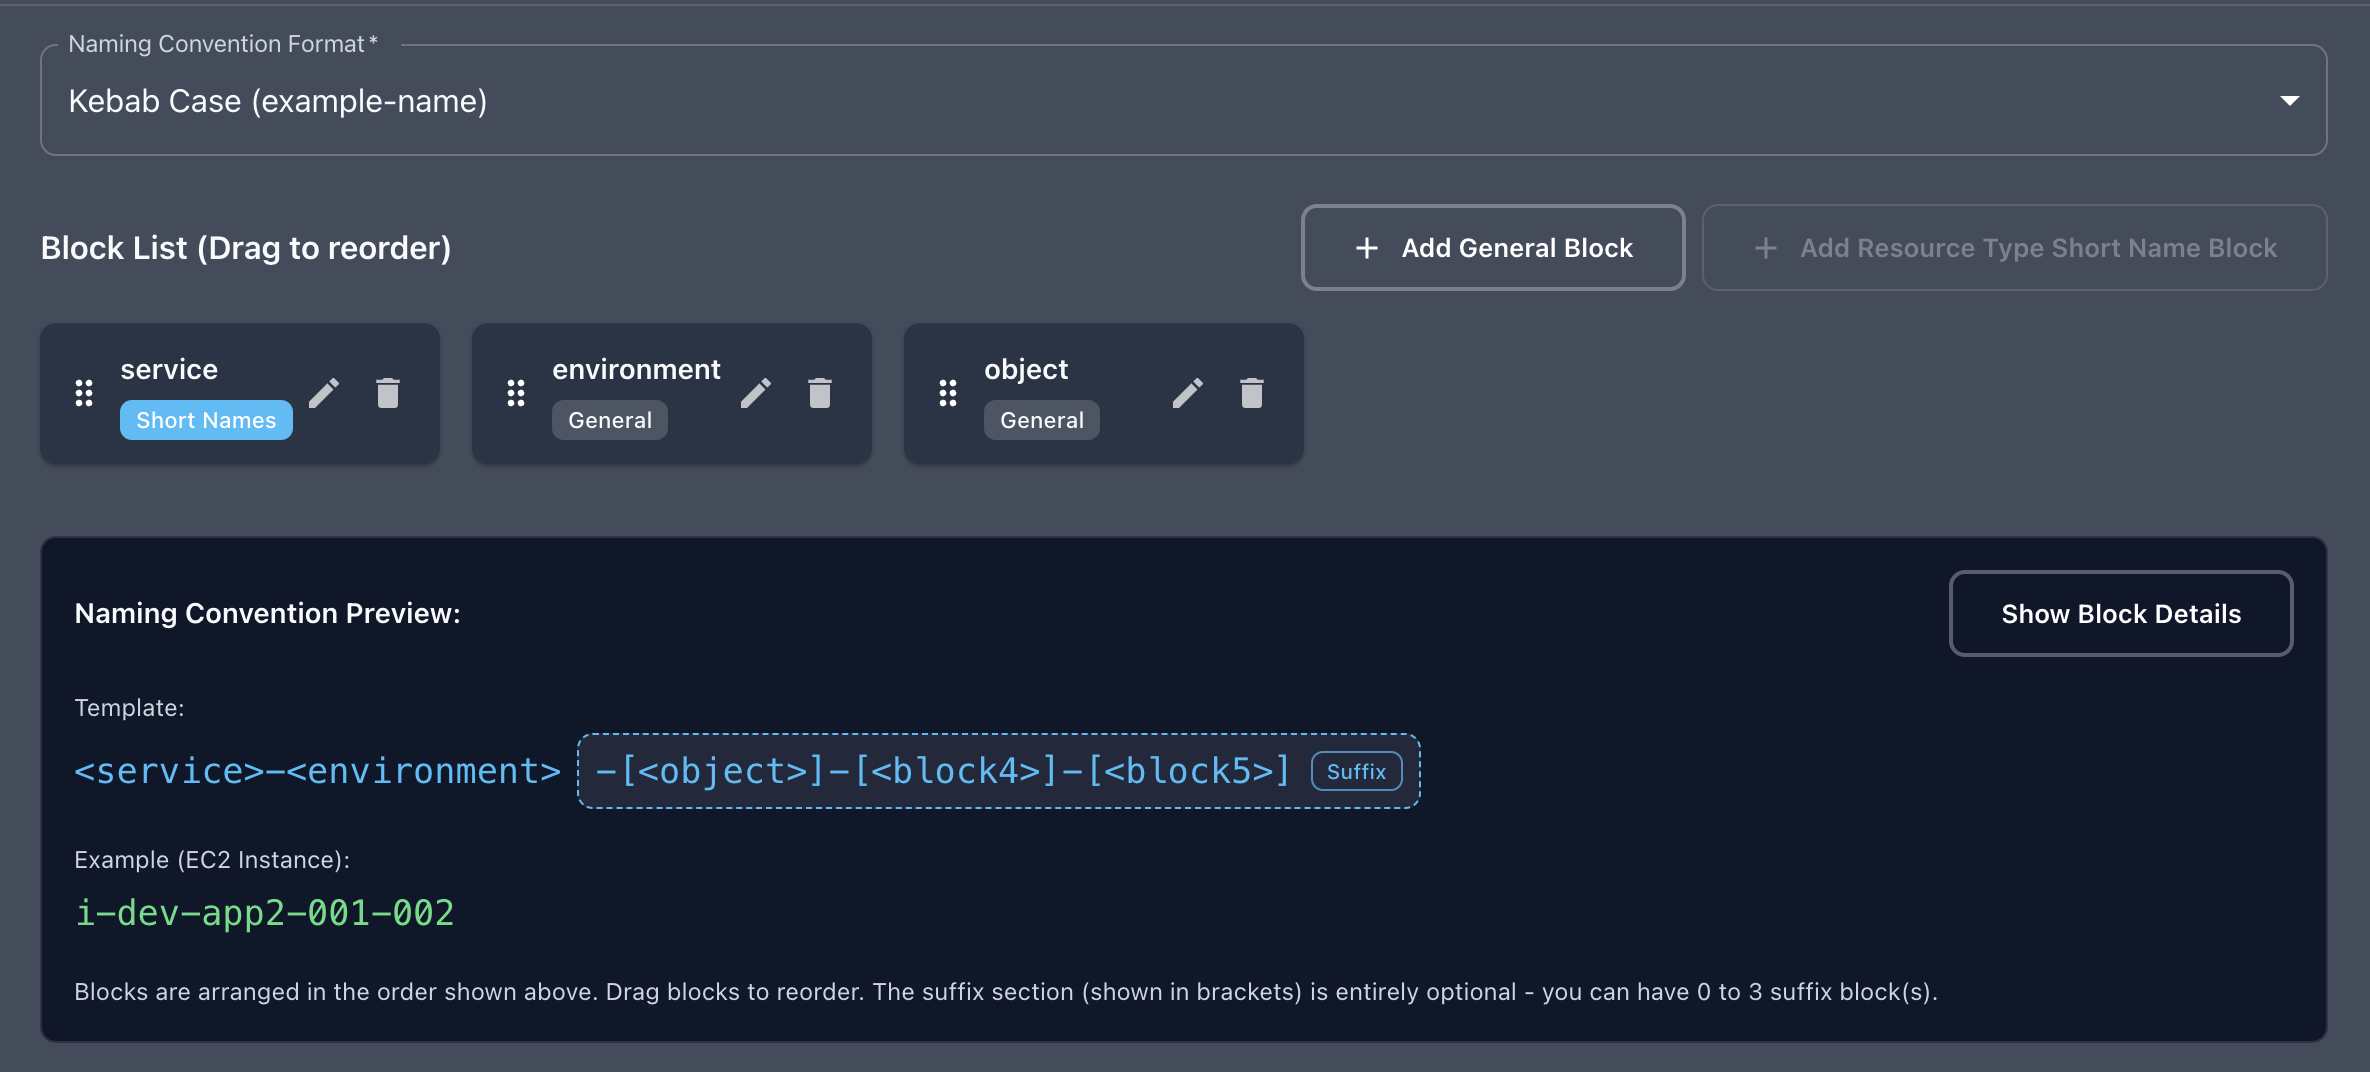
Example structure:
- Priority 1:
service(short_names block) - Priority 2:
environment(general block) - Priority 3:
object(general block, becomes suffix if suffix is enabled)
Step 5: Configure Suffix Rules
Suffix rules specify how additional name segments—beyond those defined in the structure—are processed. All additional suffix blocks will follow the same validation rules as the last block in your structure.
- No Suffix: No extra segments are allowed (the last structure block is always required).
- Limited Suffix: Allows up to N additional segments. Every segment beyond the structure must match the rules of the last structure block. For example, if N = 3, you can have up to two additional segments ( + last structure block), each validated exactly like the last structure block.
- Unlimited Suffix: Any number of extra segments are allowed, and each must match the same rules as the last structure block.
Important: In both Limited suffix and Unlimited suffix modes, the last structure block acts as a template—all suffix blocks must conform to its rules, and are optional (minimum 0 blocks).
Example: If your rule uses a "limited_suffix" with Repeat Count: 2:
- You can have at most 1 additional suffix blocks that follow the rules of the last structure block.
- Valid:
vpc-dev-product-v01(the last structure block + 1 suffix block) - Invalid:
vpc-dev-product-v-02-new(the last structure block + 2 additional blocks, exceeds limit of 2) All additional segments after the structure must individually match the rules assigned to the last structure block.
Step 6: Save the Rule
- Enter a unique rule name
- Click Save to create the rule
Managing Rules
Viewing Rules
The Naming Conventions page displays all rules with:
- Rule name
- Number of attached accounts
- Action buttons (Edit, Delete, Manage Attachments)
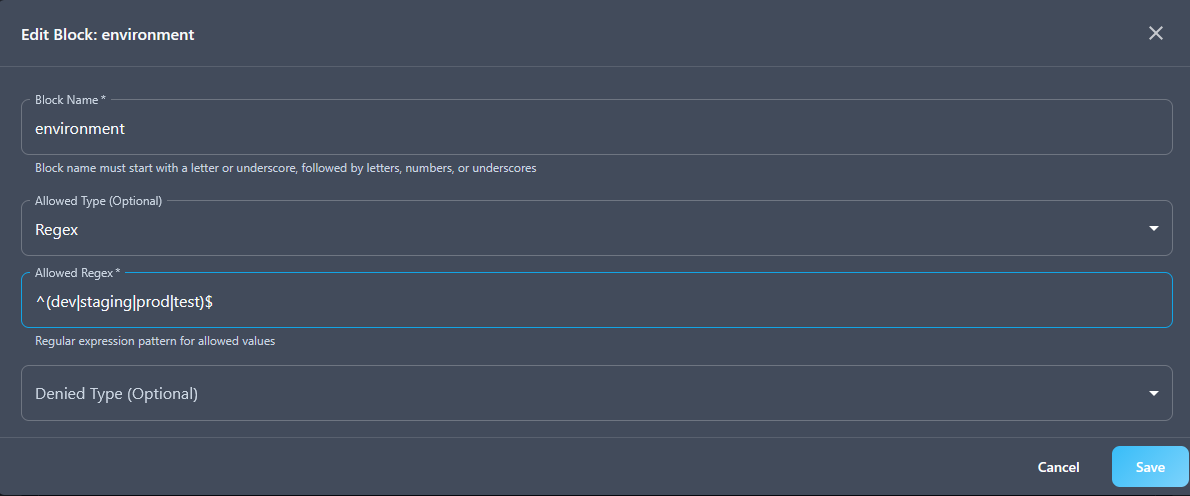
Editing Rules
- Click the Edit icon next to a rule
- Modify the rule configuration
- Click Save to update
Note: After updating a rule, you should recalculate compliance to update all resource statuses.
Deleting Rules
- Click the Delete icon next to a rule
- Confirm deletion
Important: You must detach a rule from all accounts before deleting it.
Attaching Rules to Accounts
Attach a Rule to an Account
- Click the Manage Attachments icon (link icon) next to a rule
- In the dialog, find the account you want to attach
- Click the Attach button (plus icon) next to the account
Note: If an account already has a rule attached, attaching a new rule will automatically detach the old one.
Detach a Rule from an Account
- Open the Manage Attachments dialog for a rule
- Click the Detach button (unlink icon) next to the account
View All Attachments
- Click Manage Attachments without selecting a specific rule
- Use the dropdown to assign or change rules for each account
Viewing Compliance Status
Using the Inventory Page
- Navigate to Inventory
- Switch to Naming Compliance mode using the toggle button
- View resources with their naming convention status:
- Valid: Green chip - name conforms to the rule
- Invalid: Red chip - name does not conform
- Not Defined: Gray chip - no rule attached to account
Filtering by Status
In Naming Compliance mode, you can filter by:
- Naming Status: All, Valid, Invalid, Not Defined
- Acknowledgment Status: Not Acknowledged, Acknowledged
Acknowledgment Tabs
- Not Acknowledged: Shows all resources that haven't been acknowledged (both valid and invalid)
- Acknowledged: Shows only invalid resources that have been acknowledged
Acknowledging Invalid Resources
Acknowledgment allows you to mark invalid resources as intentional exceptions:
- Navigate to Inventory in Naming Compliance mode
- Find an invalid resource (red "Invalid" chip)
- Click the Acknowledge button (checkmark icon) in the Actions column
- The resource will move to the "Acknowledged" tab
Removing Acknowledgment
- Switch to the Acknowledged tab
- Find the resource you want to un-acknowledge
- Click the Remove Acknowledgment button (cancel icon)
Note: Valid resources cannot be acknowledged. Only invalid resources can be acknowledged.
Editing Resource Names
Some resources allow their names to be edited directly from the Inventory page:
- Navigate to Inventory in Naming Compliance mode
- Find a resource with the Edit Name button enabled
- Click the Edit Name button (pencil icon)
- Enter the new name in the dialog
- Click Save
The system will:
- Update the resource's "Name" tag
- Automatically revalidate the name against the naming convention rule
- Update the compliance status
Recalculating Compliance
After creating, updating, or attaching naming convention rules, you should recalculate compliance to update all resource statuses:
- Navigate to Naming Conventions
- Click the Recalculate button
- A notification confirms the recalculation has started
Important: - Recalculation runs asynchronously in the background - It may take several minutes for large inventories - You can continue working while recalculation is in progress - Resource statuses will update automatically when recalculation completes
What Recalculation Actually Does
When you start recalculation:
- TagOps reads all resources from for your tenant and, for each resource:
- Fetches the naming convention rule attached to the resource’s account (if any).
- Runs the Naming Convention Analyzer on the resource name.
- Updates status if the status has changed.
- If a resource becomes valid during recalculation and
acknowlegmentflag is enabled, TagOps automatically desable the flag so the resource is treated as fully compliant (no acknowledgment needed). - If a resource is invalid or not_defined, recalculation does not change the
acknowlegmentflag—existing acknowledgments are preserved.
This means:
- Use recalculation whenever rules change or accounts get (re)attached to rules
- You will never lose acknowledgments for intentionally invalid resources just by running recalculation.
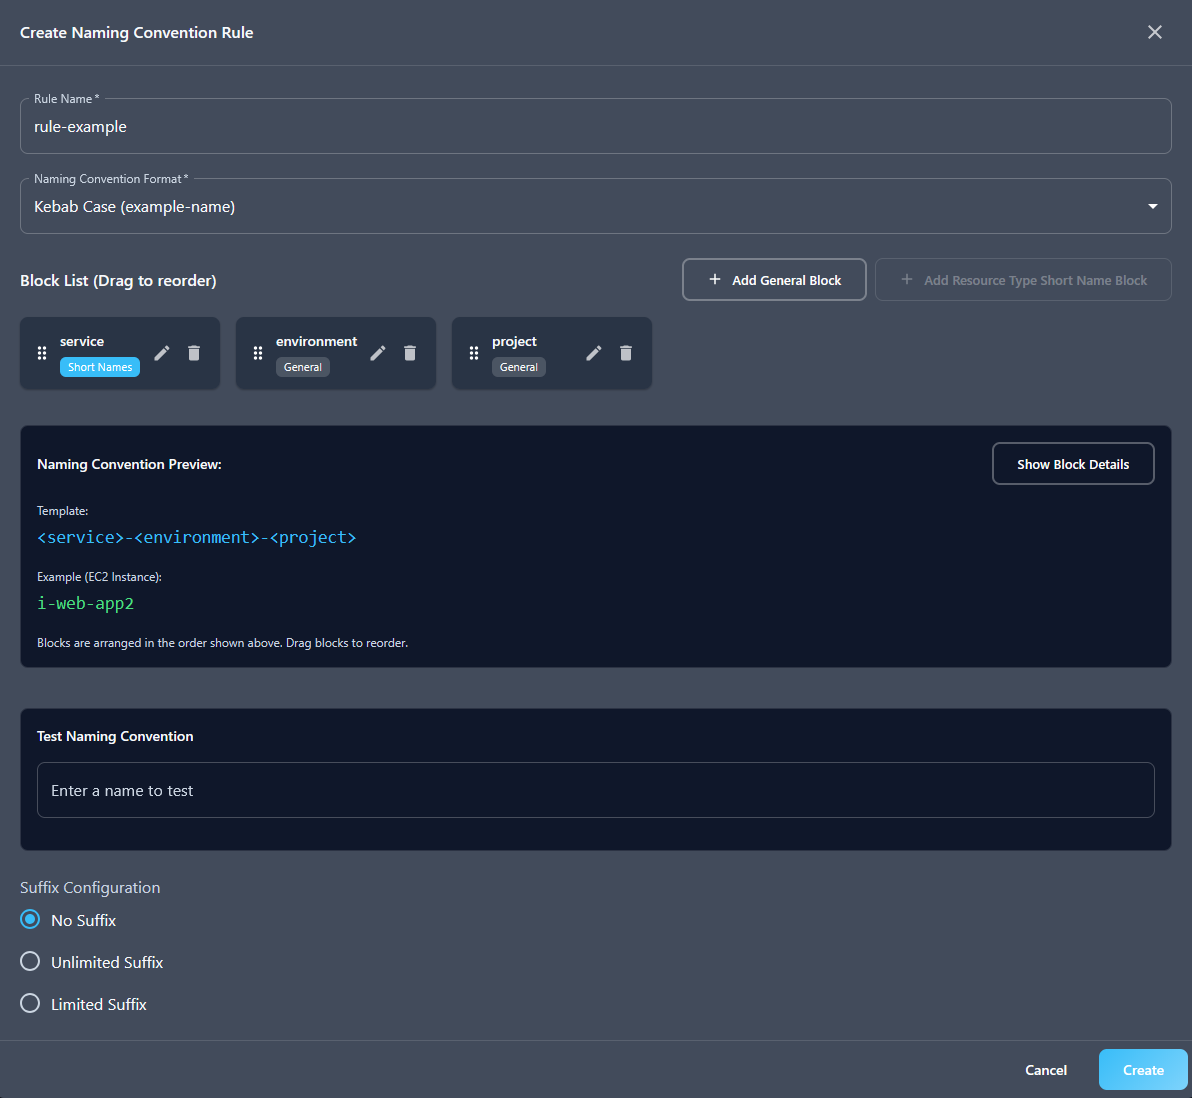
Example: Creating a Complete Rule
Let's create a rule for EC2 VPC resources with the format: {short-name}-{environment}-{project}
Step 1: Naming Format
Select kebab-case
Step 2: Block List
Service Block (Short Names):
Environment Block (General):
Project Block (General):

Step 3: Structure
- Priority 1:
service - Priority 2:
environment - Priority 3:
project
Step 4: Suffix
Select No Suffix
Step 5: Save
Name: "EC2 VPC Naming Standard"
The end result should look like this:
Result
Valid names:
vpc-dev-myprojecti-staging-frontendsgr-prod-backend
Invalid names:
vpc-dev-myproject-extra(suffix not allowed)net-production-myproject(environment not in allowed list)myproject-vpc-dev(wrong order)